Backyard Kids Rock Climbing Wall
Backyard Kids Rock Climbing Wall
How to Build a Kids Climbing Wall
Kids got you climbing the walls? Get them climbing this wall! Cure your family's cabin fever with this easy-to-build climbing wall.
Every editorial product is independently selected, though we may be compensated or receive an affiliate commission if you buy something through our links. Ratings and prices are accurate and items are in stock as of time of publication.
Introduction
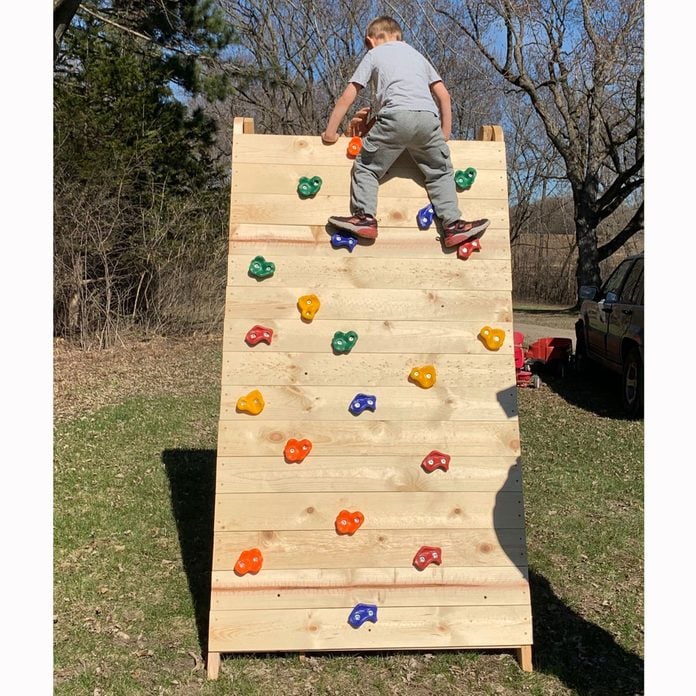
This folding A-frame climbing wall is an easy one-day project that will introduce your kiddos to new heights of play while keeping them busy and active.
Tools Required
Materials Required
- 1-5/8-in. deck screws (self piloting)
- 16 ft. of 1-in. rope
- 1x6 x 8 ft. board (15)
- 2x4 x 8 ft. (4)
- 2x6 x 8 ft. (4)
- 3-in. exterior wood screws
- 3/8-in. carriage bolts (2)
- 3/8-in. locking nuts (2)
- 3/8-in. washers (6)
- 4-1/2 x 12-in. J bolts
- 5/16 x 1 x 1-1/2-in. screw eyes (4)
- Kids climbing holds (20)
ⓘ
Choose your wood
Make sure your boards are straight, flat and have four good edges. Avoid splits or blow outs on the ends. I chose to work with cedar 2×6 and pine 1×6 for affordability and weight. Pressure-treated lumber is too heavy and I still don't trust all those chemicals. You could go with all cedar, but that gets expensive in a hurry. My total for lumber, hardware and climbing holds was about $225 at The Home Depot.
Editor's Note: My five-year-old grandnephew took immediately to both sides of the wall. He found different routes with the climbing holds and loved climbing up the ropes. His dad even found out that he could grab both ropes for his suspension training workout. So there is something for every family member with this wall.
Project step-by-step (7)
Step 1
Make the legs
- Cut 45 degree angles at the end of each 2x6 leg.
- Make a mark six inches from the opposite end of the 45-degree angle cut, 1 inch from the short edge of the leg.
- Set a nail on the mark. Using string with a loop around the nail, hold your pencil on the string at the end of the leg and draw a radius.
- Remove the nail and drill a 1/2-in. hole on the mark, then cut the radius with a jig saw.
- Use the one complete leg as a template for the other three legs and repeat the process.

Step 2
Cut cross braces and assemble frames
- Cut two 2x4's to 44 inches each and then two more at 40-5/8 in. Because we want one side of the A frame to nest into the other, I subtracted three inches (the thickness of two 2x6's) plus 3/8 in. for the spacer washers.
- Using 3-in. screws, install each pair of cross braces on the long edges of the legs, five inches from the top radius and six inches from the bottom.
- Nest the narrower frame inside the other and line up the 1/2-in. holes. With a hammer, knock the 3/8-in. carriage bolts in from the outside of legs, setting two spacer washers between each pair of legs. Install a washer and lock nut on threaded end of the bolt. Be sure not to over tighten lock nut; you want it just snug so the two legs will pivot smoothly.

Sign Up For Our Newsletter
Complete DIY projects like a pro! Sign up for our newsletter!
Do It Right, Do It Yourself!
![]()
Step 3
Cut and install face boards
- Cut 15 pieces of 1x6 at 47 in. and another 15 at 45-1/2 in.
- Starting at two inches below top radius, install boards with 1-5/8-in. deck screws. Use two screws each side, right and left, of every board. Keep screws one inch back from the board edges to avoid splitting. Keep boards tight to each other and square to the frame as you work your way towards the bottom.

Step 4
Cut holes and install screw eyes for climbing rope
- At the top of the narrow wall face, measure 10-3/4 in. from each side and 2-1/4 in. down from the top board. At these marks drill two 1-1/4-in. holes using a spade bit
- With a 1/4-in. drill bit make two pilot holes below the center of the two 1-1/4-in. holes into the top 2x4 cross brace. These holes will receive the 5/16 x 1 x 3-in. screw eyes. Also, keep the pilot holes centered in the top edge of the 2x4 cross brace.
- Install the screw eyes so they line up with the 1-1/4 holes. You might need place a screwdriver in the eye of the screw for extra torque when threading it in.
- Thread each 8 ft. length of rope through the face holes into screw eyes and tie off.

Step 5
Install climbing holds
- Using a 1/2-in. drill bit make 20 random holes in the wide wall side. Use your judgement for spacing; it never hurts to have a few extra holes for different layouts.
- Each hold should have two mounting holes. Install snugly with one bolt at first. Position the hold to your liking, and drill again through the remaining mounting hole to install the second bolt.
- Tip: This process will go much faster with a drill/driver or impact driver coupled with a socket or hex head, depending on what type of bolt your holds require. (The climbing holds I ordered came with a 1/2-in. drill bit and a hex driver bit, nice!).

Step 6
Install screw eyes for ground stakes
- Drill four 1/4-in. pilot holes at the foot of the each leg about 1-1/2 in. from the edge and 3-in. up from the tip of the 45 degree angle.
- Thread in the 5/16 x 1 x 1-1/2-in. screw eyes that will receive the 12-in. J-bolts for anchor stakes.

Step 7
Finishing Touches
- Sand off any rough or splintered edges. Make sure there are no high screw heads hanging up.
- Find a good level spot, roughly 8 ft. square and free of obstacles.
- With another adult, move climbing wall into place.
- Hold the kids back until you set the desired angle and drive in the ground stakes
- Turn the kids loose! Be sure to spot check the younger ones until they get the hang of it. This climbing wall is the perfect addition to a swing set or playset.
Similar Projects
Backyard Kids Rock Climbing Wall
Source: https://www.familyhandyman.com/project/how-to-build-a-kids-climbing-wall/


Tidak ada komentar:
Tulis komentar